Message Broker: Maybe Invented Here

NIH (Not Invented Here) is a common initialism that refers to excluding solutions that the project itself did not create. For example, some game studios NIH their own game engines, where others license an existing engine. There are advantages to both and neither is always correct. For me, I have a tendency to NIH things when working in Rust. This post is to help me understand why.

When I started with Rust, I built an example bot for one of the The AI Games challenges. The focus of that project was parsing the protocol and presenting it in a usable way for folks to get started with and extend into their bot. I built my parser from scratch, at first focusing on getting it working. Then spending time looking at other parsers to see how they go faster, and what the their interfaces in Rust look like. I updated the implementation to account for this research and I learned a lot about both Rust itself and implementing low level parsers.

I did similar for another couple projects. Spending a lot of time implementing things that there were libraries to do or at least assist with. Something I’ve started to notice over time: I’m using libraries for the parts I used to NIH. Especially the more serious I am about completing the project.

In my broker I’m doing little parsing of my own. I resisted using PlainTalk for my text protocol because I didn’t want to write the parser in a few languages. I’m using JSON since most languages have an implementation already, even if it isn’t the best to type. My only libraries so far are for encoding and decoding the allowed formats automatically. This means my socket and thread handling has been all custom or built into Rust itself.

I definitely get joy out of working at those layers. Which is an easy explanation for NIHing those parts while working on a project in general. I’m also learning a lot about the design as I implement my own. But I find myself at a crossroad. Continuing to NIH the layer and spend a week on getting a workable socket, thread, and job handling story. Or I can entangle the fate of my project with the Rust community more. To explain lets talk about some pros and cons of NIH or using other’s projects.

NIHing something means you can build something custom to your situation. It often takes more up front time than using an external solution. Your project will need to bring in or build up the expertise to handle that solution. The more central to the heart of your project, the more you should NIH. If the heart of your project is learning, then it could make sense to NIH as much as possible.

Using something external means doing research into the many solutions that could fit. Narrowing down to a final few or one solutions to try. Then learning how to use that solution and adapt it to your project. Often the solution is not a perfect fit but the savings on time and required expertise can make up for it. There is an accepted risk of the external project having different goals or being discontinued.

This morning I found myself staring down the problem of reading from my sockets in the server. Wanting to be efficient on resources I didn’t want to only rely on interval polling. I started by looking in the Rust standard library for a solution. The recommendations are to create a thread per connection, use interval polling, or external libraries. Thread per connection wont work for me with my goals. The resource cost of switching between a lot of threads shadows the cost of the work you are trying to perform. I had already ruled out interval polling. A less recommended path is wrapping the lower level mechanisms yourself.

So, I started looking into more and less complete solutions to these problems. When using less complete solutions, you can glue a few together. Creating a normalized interface on top of them that your project can use. The more complete solutions will do that normalization for you. Often at a cost of not closely matching your needs. This brings me to what I mean by entangling my project’s fate with the Rust community more.

Tokio is a project the Rust community has started to center around for building services, protocol parsers, and other tools. Designed to handle a large part of the asynchronous layer for users. I heard about it at RustConf 2016 and read about it in This Week In Rust. My understanding stayed high level and I’ve not had any serious Rust projects to apply it. I began looking into it as a solution for my broker and was delighted. Their breakdown of this problem is similar to how I have been designing my broker already. The largest difference being their inclusion of futures.

The architecture match with Tokio, as well as the community’s energy, makes it a good choice for me. I’ll need to learn more about their framework and how to use it well as I go. But, I’m confident I’ll be able to refactor my broker to run on top of it in a day or so. Then I can get the rest of the minimal story for this message broker done this week. Once I have it doing the basics with at least the Rust driver, I’ll open source it.

Message Broker: Into String

Strings in most native or performance focused languages tend to present a fair amount of complexity and Rust is no exception to this. There are cases where you have a struct that needs to have a name, such as:

struct ServiceHandle {
    name: String,
}

The first ServiceHandle::new() function I would typically write when first learning Rust would look like this:

fn new(name: String) -> ServiceHandle {
    // other init stuff
    ServiceHandle { name: name }
}

In the real world I generally have a String to pass to ServiceHandle::new(String) so this API works well. But when I’m writing tests for my code, I want to pass hard coded values with type &'static str. In order to do that, I have to call one of the conversion functions.

ServiceHandle::new("listener".into());
ServiceHandle::new("listener".to_owned());
ServiceHandle::new(String::from("listener"));

If I change the signature to something like:

fn new(name: &str) -> ServiceHandle {
    // other init stuff
    ServiceHandle { name: name.to_owned() }
}

Then I have to remember to prefix String with & when passing to the function. Another possibility is to from_string and from_str which is what I started to rely on next. Then I don’t have to remember as much, just use the right one for the right type.

fn from_str(name: &str) -> ServiceHandle {
    // skip init stuff, let from_string do it
    ServiceHandle::from_string(name.to_owned())
}

fn from_string(name: String) -> ServiceHandle {
    // other init stuff
    ServiceHandle { name: name }
}

This gets me into a better state where it is easy to remember what string type it takes, but it feels clumsy. Rust provides the From and Into traits that types can implement to enable more generic coding. They are as their name implies a way to automatically change types. They are “reflexive” which means that if one of them is implemented the other can use it. For example, impl From<A> for B would allow you to write a function like fn thing<T: Into<B>>(arg: T) which could be called like thing(A {}).

So the next iteration of my ServiceHandle::new() went generic:

fn new<S: Into<String>>(name: S) -> ServiceHandle {
    ServiceHandle { name: name.into() }
}

This allows calling with String, &str or several other types that can automatically be converted into a String. Making writing testing code with &'static str simple, while dynamically generated String objects still a first class citizen.

Message Broker: Goals and (De)Motivations

Recently, I read a twitter rant that described message brokers as poor combination load balancer, database, and service discovery tools. It hit me hard since I’d just spent a week diving into writing my own message broker. While I had my dislikes of brokers, I think they are handy tools. The tweeter stated that many of these things should be built into the services. The goal of which to keep the heavy work out of the center of the system. Message brokers doing the opposite when used as a central bus.

Having this description of the problem space is turning out to be nice. It gives me some different framing for the various parts of the message broker I’ll be building and the underlying needs. It also pointed out a heavy flaw that message brokers as a central bus can cause trouble in some systems. While that twitter rant dismayed me at first, I now feel even more energized in building this tool.

This framing of load balancer, database, and service discovery reminds me to go read up on that tech as well. Sourcing papers for those problems while looking into queuing related things. I can acknowledge and make sure these subproblems get solved well enough for my intended scale. That will be a key part of my design going forward, keeping my decisions favoring small to medium scale. I’ve seen message brokers work well in those scenarios and want to make an even better one of those.

This doesn’t mean one couldn’t use the broker in a larger scale operation. But, I’m architecting it to encourage deliberate clustering beyond medium scale. Clustering acknowledges the fact that there are usually groups of services that are able to meet a work request without speaking outside of their group except for one or two edges. What I hope to discover as part of the development process is how to encourage this. Whether documenting and creating examples will be enough, or if I’ll need more core features.

I think keeping the message broker light weight will be instrumental in encouraging clustering. If the message broker is heavy, folks wouldn’t want to run too many instances. If it requires a lot of tuning to be useful, folks will want to only tune it once as a central bus. Side note: as I typed this I realized this is why Redis is so good.

Among the lofty design and architecture goals I want to mention my motivations and put the goals in perspective. This project’s main goal is to be a learning project. I want to better understand the internals of message buses. Most green field backend projects will be utilizing a message bus and smaller services. Understanding the internals of the message bus and keeping them in mind will let me design better services.

I also want to build a complex, performance focused, realistic piece of software in Rust. I find the language fun to work with and writing my own thread orchestration that is safe is delightful. As I build up the basics in the broker and client, I’m learning a lot of practical Rust skills. Like many others writing and coding in Rust in their free time, I’m hoping this will help encourage more jobs writing Rust. If I’m lucky enough, I’ll get to secure one of those jobs.

Message Broker: Channel Naming

I’ve started building a message broker as a learning project. There are several out there such a RabbitMQ, Kafka, Redis’ pub/sub layer, and some brokerless message queue solutions like 0mq. Having used many of them over the years and studying the topic both from the classic “Enterprise Integration” side and the more modern/agile “Microservices” side, I figured I’d try my hand at implementing one.

In this blog post, I’m going to go over how I designed and implemented channel naming. Channel names fill the role of data descriptor used by the publishers and the role of query language for subscribers. This turned out to be a delightful series of problems to explore. Questions such as “how do people use them”, “what features are expected”, “what limitations are common” came up. Realizing that my message broker is essentially providing a naming framework that will have at least some opinion, I needed to ask “are there practices I want to encourage or discourage” and recognize my influence.

In almost all message queue systems, channels have a string based name. This name may be broken up by delimiters, and that delimiter is sometimes chosen by the client or in a config on the broker. Most support the ability to wild card parts of the channel when subscribing. Sometimes the wild card is purely string based, in delimited channels often the wild card is done by chunk. Wild cards are sometimes restricted in what positions they can be in, almost always allowed at the end, sometimes in the middle and sometimes disallowed at the start.

When deciding between these I also wanted to keep in mind what solutions are relatively easy to code, straightforward to debug, and allow for acceptable performance. Not allowing wild cards at all means that simple string comparison works, but omits a common feature. Using simple strings and a well known text query setup like regular expressions would give huge amounts of flexibility in selecting what messages you’d like, but comes with a large performance cost, libraries, and is much harder to spot debug. I decided that since I’m not going to use a common query language, that I’d want to make the names as simple as possible to parse.

A Rope is a data structure I’d heard about a few times and I knew it had something to do with making string operations faster, but I was hazy on the details. Since this is a project without deadlines, I set about reading a paper on them to learn more. Shortly into the paper it was clear this wasn’t the solution for me, ropes are designed for larger bodies of text, manipulating that text in a variety of ways, and making common editor features easier to implement. But it shared that part of the problem was breaking down the text, and part of it was comparing text.

Since channel names are often a hierarchy that uses the delimiter to separate the layers, I split the name using that delimiter into an array. But that then left me with a bunch of smaller strings I had to compare, which seemed much slower than just walking through the name and query once, using the wild cards to skip characters. To avoid a char by char parse on every channel name comparison, I drew on the common native layer practice of hashing strings then comparing the hashes. Hashing has an up front cost of processing the string into a numeric form, but then makes comparisons extremely fast. Since a message’s channel would be used to query for appropriate subscribers, it could be hashed once and compared many times. An unfortunate side effect of hashing the substrings though, I wouldn’t be able to allow partial segment matches. The wild card would be all or nothing in a given position, just a.* no a.b*.

I decided that side effect of only allowing wild cards at the segment layer was ultimately a good thing. While there may be transition times where the feature of partial segment matching would help, it would allow people to break the idea that each segment is a complete chunk of data. This similar reasoning is why the only selectors are exact and wild card, no numeric or alpha only sorts of selection.

After all this research, thinking, note taking, and general meandering thing the computer science fields, I started to implement my solution in Rust. My message broker isn’t actually ready for the channel names yet, as I’m still working on how to manage connections and properly do the various forms of store and forward. But this problem tickled me so I set about solving it anyway. I created a file channel.rs to try building these ideas.

I started with a basic struct with the string form of the name for debugging, and a hashed form of the name for comparisons.

struct Channel {
    raw_name: String,
    hashed_name: Vec<Option<u64>>
}

raw_name is a String so the struct can own the string without any lifetime concerns of a str, this value will mostly be used for debugging or admin purposes. The hashed_name is a Vec so it can be variable sized, currently I have no limit on the number of delimiters you can use. Option is what I used to handle the wild card. If it was Some<u64> then you have a hash to compare. If it was None then it was wild card and you don’t have to compare it. After thinking harder though, I realized that I didn’t want to have the binary Option as my indicator for whether to use a wild card or not. If I added a new type of wild card, for instance, one that allowed any number of segments, I’d have to replace my Option usage everywhere. So instead I’ve preemptively changed to using my own ChannelSegment type like so:

struct Channel {
    raw_name: String,
    hashed_name: Vec<ChannelSegment>
}

enum ChannelSegment {
    Wild,
    Hash(u64)
}

Next, I set about parsing the input. I knew that hard coding strings in tests meant that I wanted to have a from_str variant. People will often have hard coded channel names but there will also be generated ones, and for that allowing a from_string is nice. I also knew I was going to turn it into a String anyway to assign to raw_name. So I did the following to enable both:

pub fn from_str(input: &str) -> Result<Channel, String> {
    Channel::from_string(input.to_owned())
}

pub fn from_string(input: String) -> Result<Channel, String> {
    // parsing code goes here
}

Parsing was a pretty simple matter. Using String.split(char) to get an iterator returning each segment. Then relying on Rust’s pattern matching for cases I specifically cared about matching, like empty string (which I made into an error to prevent mistakes) and "*" which is the wild card character. Building up the hashed name, then returning it.

let mut hashed_name = Vec::new();
for chunk in input.split('.') {
    match chunk {
        "" => {
            return Err("empty entry is invalid".to_owned());
        }
        "*" => {
            hashed_name.push(ChannelSegment::Wild);
        }
        _ => {
            hashed_name.push(ChannelSegment::Hash(calculate_hash(&chunk)));
        }
    }
}
Ok(Channel{
    raw_name: input,
    hashed_name: hashed_name
})

One could easily see using a LRU Cache (Least Recently Used cache that removes the oldest entries when it gets too full) to skip parsing the channel name for the most commonly used channels, but I’m not doing that yet until this proves to be a part that is slowing me down.

To compare between two Channels I added a .matches(&Channel) method. I decided against implementing PartialEq since I wouldn’t be testing for exact match, but instead match when considering wild cards, and most developers expect a more exact match when using ==.

pub fn matches(&self, other: &Channel) -> bool {
    if self.hashed_name.len() != other.hashed_name.len() {
        return false;
    }
    for (a, b) in self.hashed_name.iter().zip(&other.hashed_name) {
        if let (&ChannelSegment::Hash(inner_a), &ChannelSegment::Hash(inner_b)) = (a, b) {
            if inner_a != inner_b {
                return false;
            }
        }
    }
    
    true
}

Since my only wild card is for a single whole segment, I know I can immediately return if they have different lengths. Then I zip the two hashed_name together so I can iterate through them at the same time. In other languages one would commonly just create an integer, increment that and use it to index into both of the sequences at the same time, ensuring to not walk past the end ourselves. In Rust we rely on iterators to give us fast access to our sequences with minimal checking, keeping us safe against others (or ourselves) mutating the sequences in dangerous ways while iterating. Using zip we can create an iterator that walks both sequences at the same time keeping our to our land of safety and speed.

As a side note, the calculate_hash function is one I pulled from the docs but changed a little bit to fit my style better:

fn calculate_hash<T: Hash>(t: &T) -> u64 {
    let mut hasher = DefaultHasher::new();
    t.hash(&mut hasher);
    hasher.finish()
}

A feature of Rust I really enjoyed while developing this, was the ability to write tests in the same file as I went. I could quickly write a few examples then make the code pass, focusing on just the higher level parts of the API and not testing the internals so much. Think more “this errors, this does not error” and less “this returns a vector of integers that are ascending…” while you are adding such tests, to make sure you can quickly change out the implementation while the idea keeps working, here are the tests I wrote as I was developing:

#[test]
fn create_basic_channel() {
    Channel::from_str("a.b.c").unwrap();
    Channel::from_str("name").unwrap();
}

#[test]
fn create_with_wildcard() {
    Channel::from_str("a.*.b").unwrap();
    Channel::from_str("*").unwrap();
    Channel::from_str("*.end").unwrap();
    Channel::from_str("start.*").unwrap();
}

#[test]
fn create_invalid() {
    assert!(Channel::from_str(".a.b").is_err());
    assert!(Channel::from_str("c.b.").is_err());
    assert!(Channel::from_str("g.l..b").is_err());
    assert!(Channel::from_str("").is_err());
}

#[test]
fn matches_with_self_exact() {
    let channel = Channel::from_str("a.b.c").unwrap();
    assert!(channel.matches(&channel));
    let channel = Channel::from_str("a").unwrap();
    assert!(channel.matches(&channel));
    let channel = Channel::from_str("dabbling.b.c").unwrap();
    assert!(channel.matches(&channel));
    let channel = Channel::from_str("abba.bobble").unwrap();
    assert!(channel.matches(&channel));
}

#[test]
fn not_matches_exact() {
    let channel_full = Channel::from_str("s.t.r").unwrap();
    let channel_sub = Channel::from_str("s.t").unwrap();
    assert!(!channel_full.matches(&channel_sub));
    assert!(!channel_sub.matches(&channel_full));
}

#[test]
fn matches_with_self_wild() {
    let channel = Channel::from_str("a.*.c").unwrap();
    assert!(channel.matches(&channel));
    let channel = Channel::from_str("*").unwrap();
    assert!(channel.matches(&channel));
    let channel = Channel::from_str("*.b.c").unwrap();
    assert!(channel.matches(&channel));
    let channel = Channel::from_str("abba.*").unwrap();
    assert!(channel.matches(&channel));
}

#[test]
fn matches_wild_card_one_side() {
    let wild_channel = Channel::from_str("alpha.beta.*").unwrap();
    let tame_channel = Channel::from_str("alpha.beta.charlie").unwrap();
    assert!(wild_channel.matches(&tame_channel));
    assert!(tame_channel.matches(&wild_channel));
}

Mostly mundane stuff, values all quickly typed in to ensure the general concept works, and common edge cases in parsing (start, end, middle) are covered. But note this isn’t combinatorially testing this, there isn’t unicode or other trouble points, those sorts of tests can come with time. Being able to add in a new test quickly when I noticed an edge case is easily one of my favorite features of Rust.

I’ll be open sourcing my work in progress soon, but for now it mostly lives in my notebook as some scribbles, and a smattering of mostly disconnected code on my laptop. If you have feedback on this blog post, how I’ve setup channels in my message broker, or generally about my rust code I’d love to hear it in comments below. Before the comments roll in though, I know using Strings for errors is not great, I just don’t have an error system setup in my project yet.

Describing and Debugging Change Over Time in a System

So, Aria Stewart tweeted two questions and statement the other day:

https://twitter.com/aredridel/status/785543998115082241

I wanted to discuss this idea as it pertains to debugging and strategies I’ve been employing more often lately. But lets examine the topic at face value first, describing change over time in a system. The abstract “system” is where a lot of the depth in this question comes from. It could be talking about the computer you’re on, the code base you work in, data moving through your application, an organization of people, many things fall into a system of some sort, and time acts upon them all. I’m going to choose the data moving through a system as the primary topic, but also talk about code bases over time.

Another part of the question that keeps it quite open is the lack of “why”, “what”, or “how” in it. This means we could discuss why the data needs to be transformed in various ways, why we added a feature or change some code, why an organization is investing in writing software at all. We could talk about what change at each step in a data pipeline, what changes have happened in a given commit, or what goals were accomplished each month by some folks. Or, the topic could be how a compiler changes the data as it passes through, how a programmer sets about making changes to a code base, or how an organization made its decisions to go in the directions it did. All quite valid and this is but a fraction of the depth in this simple question.

Let’s talk about systems a bit. At work, we have a number of services talking via a messaging system and a relational database. The current buzz phrase for this is “micro services” but we also called them “service oriented architectures” in the past. My previous job, I worked in a much smaller system that had many components for gathering data, as well as a few components for processing that data and sending it back to the servers. Both of these systems shared common attributes which most other systems also must cope with: events that provide data to be processed happen in functionally random order, that data is fed into processors who then stage data to be consumed by other parts of the system.

When problems arise in systems like these, it can be difficult to tell what piece is causing disruption. The point where the data changes from  healthy to problematic may be a few steps removed from the layer that the problem is detected in. Also, sometimes the data is good enough to only cause subtle problems. At the start of the investigation, all you might know is something bad happened in the past. It is especially at these points when we need the description of the change that should happen to our data over time, hopefully with as much detail as possible.

The more snarky among us will point out the source code is what is running so why would you need some other description? The problem often isn’t that a given developer can’t understand code as they read it, though that may be the case. Rather, I find the problem is that code is meant to handle so many different cases and scenarios that the exact slice that I care about is often hard to track. Luckily our brains are build up these mental models that we can use to traverse our code, eliminating blocks of code because we intuitively “know” the problem couldn’t be in them, because we have an idea of how our code should work. Unfortunately, it is often at the mental model part where problems arise. The same tricks we use to read faster and then miss errors in our own writing are what can cause problems when understanding why a system is working in some way we didn’t expect.

Mental models are often incomplete due to using libraries, having multiple developers on a project, and the ravages of time clawing away at our memory. In some cases the mental model is just wrong. You may have intended to make a change but forgot to actually do it,  maybe you read some documentation in a different way than intended, possibly you made a mistake while writing the code such as a copy/paste error or off by 1 in a loop. It doesn’t really matter the source of the flaw though, because when we’re hunting a bug. The goal is to find what the flaw in both the code and the mental model are so it can be corrected, then we can try to identify why the model got out of wack in the first place.

Can we describe change in a system over time? Probably to some reasonable degree of accuracy, but likely not completely. How does all of this tie into debugging? The strategy I’ve been practicing when I hit these situations is particularly geared around the idea that my mental model and the code are not in agreement. I shut off anything that might interrupt a deep focus time such as my monitors and phone, then gather a stack of paper and a pen. I write down the reproduction steps at whatever level of detail they were given to me to use as a guide in the next process.

I then write out every single step along the path that the data will take as it appears in my mental model, preferably in order. This often means a number of arrows as I put in steps I forgot. Because I know the shape data and the reproduction steps, I can make assumptions like “we have an active connection to the database.” Assumptions are okay at this point, I’m just building up a vertical slice of the system and how it affects a single type of data. Once I’ve gotten a complete list of event on the path, I then start the coding part. I go through and add log lines that line up with list I made, or improve them when I see there is already some logging at a point. Running the code periodically to make sure my new code hasn’t caused any issues and that my mental model still holds true.

The goal of this exercise isn’t necessarily to bring the code base into alignment with my mental model, because my mental model may be wrong for a reason. But because there is a bug, so rarely am I just fixing my mental model, unless of course I discover the root cause and have to just say “working as intended.” As I go through, I make notes on my paper mental model where things vary, often forgotten steps make their way in now. Eventually, I find some step that doesn’t match up, at that point I probably know how to solve the bug, but usually I keep going, correcting the bug in the code, but continuing to analyze the system against my mental model.

I always keep going until I exhaust the steps in my mental model for a few reasons. First, since there was at least one major flaw in my mental model, there could be more, especially if that first one was obscuring other faults. Second, this is an opportunity to update my mental model with plenty of work already like writing the list and building any tools that were needed to capture the events. Last, the sort of logging and tools I build for validating my mental model, are often useful in the future when doing more debugging, so completing the path can make me better prepared for next time.

If you found this interesting, give this strategy a whirl. If you are wondering what level of detail I include in my event lists, commonly I’ll fill 1-3 pages with one event per line and some lines scratched out or with arrows drawn in the middle. Usually this documentation gets obsolete very fast. This is because it is nearly as detailed as the code, and only a thin vertical slice for very specific data, not the generalized case. I don’t try to save it or format it for other folks’ consumption. The are just notes for me.

I think this strategy is a step toward fulfilling the statement portion of Aria’s tweet, “Practice this.” One of the people you need to be concerned with the most when trying to describe change in a system, is yourself. Because if you can’t describe it to yourself, how are you ever going to describe it to others?

i-can-manage-it Weekly Update 3

Weekly post already? But it seems like the last one was just the other day! It’s true, it has been less than a week since the last one, but I feel like the weekend is a good time for me to write these so you’re getting another update. This post is going to be very tech heavy. So I’m going to put the less tech heavy stuff in the next couple paragraph or so, then I’m going to explain my implementation for educational purposes.

I’m currently reading Game Engine Architecture by Jason Gregory and one of the early chapters focused on development tools and how important they are. My previous full time job was building development tools for web developers so I’ve already developed an appreciation for having them. Also, you may remember my last post where I talked about debugging tools I’ve added to my game.

Games require a lot of thought and consideration to the performance of the code that is written and one of the primary metrics that the game industry uses is FPS, or Frames Per Second. This is the number of times the full screen is rendered to the screen per second. A common standard for this is 60FPS which is what most “high definition” monitors and TVs can produce. Because the frames need to be roughly evenly spaced it means that each frame gets about 16.6 milliseconds to be fully calculated and rendered.

So, I built a tool to let me analyze the amount of time each frame took to render. I knew I’d want to graph the data, and I didn’t have the ability to make graphs using my game engine. I don’t even have the ability to display text. So I went with a setup called Electron to let me use the sort of code and techniques I use for web development and am very familiar with. And this screenshot is the results:

Screen Shot 2016-10-01 at 6.43.00 PM.png

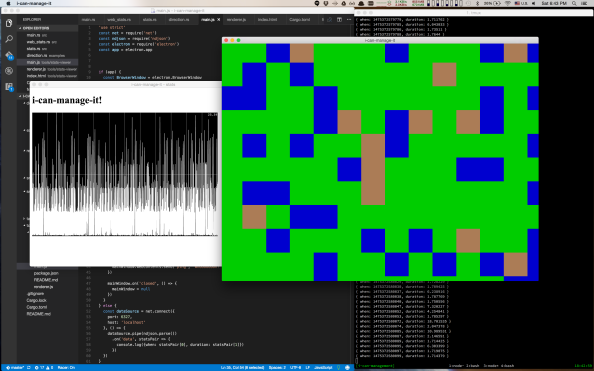
In the background is my text editor with some code, and a bunch of debug information in my terminal. On the right with the pretty colors is my game. It is over there rendering about 400-450 FPS on my mac. On the left in the black and white is my stats viewer. Right now it just shows the duration of every frame. The graph dynamically sizes itself, but at the moment it was showing 2ms-25ms range. Interesting things to note is that I’m averaging 400FPS but I have spikes that take over 16.6ms, so the frames are not evenly spaced and it looks like ~58FPS.

Ok, that’s the tool I built and a brief explanation. Next, I’m going to go into the socket server I wrote to have the apps communicate. This is the very tech heavy part so friends just reading along because they want to see what I’m up to, but aren’t programmers, this is the time to hit the eject button if you find that stuff boring and you kinda wish I’d just shut up sometimes.

To start with, this gist has the full code that I’ll be talking about here. I’m going to try to use snippets cut up with text from that, so you can refer to that gist for context if needed. This is a very simple socket server I wrote to export a few numbers out of my engine. I expect to expand this and make it more featureful as well as bidirectional so I can opt in or out of debugging stuff or tweak settings.

Lets first look at the imports, I say as if that’s interesting, but one thing to note is I’m not using anything outside of std for my stats collection and socket server. Keep in mind this is a proof of concept, not something that will need to work for hundreds of thousands of users per second or anything.

use std::io::Write;
use std::net::TcpListener;
use std::sync::mpsc::{channel, Receiver, Sender};
use std::thread;

I’ve pulled in the Write trait from std::io so I can write to the sockets that connect. Next up is TcpListener which is the way in the standard library to listen for new socket connections. Then we have channels for communicating across threads easily. Speaking of threads, I pull in that module as well.

Ok, so now that we know the pieces we’re working with, lets talk design. I wanted to have my stats display work by a single initializing call, then sending data over a channel to a stats collection thread. Because channels in rust are MPSC channels, or Multiple Producer Single Consumer channels, they can have many areas sending data, but only 1 thing consuming data. This is what lead to the interesting design of the initializing function seen below:

pub fn run_stats_server () -> Sender<Stats> {
    let (stats_tx, stats_rx) = channel();
    thread::Builder::new()
        .name("Stats:Collector".into())
        .spawn(move || {
            let new_socket_rx = stats_socket_server();

            let mut outputs = vec![];
            while let Ok(stats) = stats_rx.recv() {
                while let Ok(new_output) = new_socket_rx.try_recv() {
                    outputs.push(new_output);
                }

                let mut dead_ones = vec![];
                for (number, output) in outputs.iter().enumerate() {
                    if let Err(_) = output.send(stats) {
                        dead_ones.push(number);
                    }
                }

                for dead in dead_ones.into_iter() {
                    outputs.remove(dead);
                } 
            }
        })
        .unwrap();
    stats_tx
}

Let’s work our way through this. At the start we have our function signature,
run_stats_server is the name of our function, it takes no arguments and returns a Sender channel that sends Stats objects. That channel is how we’ll export data from the engine to the stats collector. Next we create a channel, using common rust naming of tx or “transmit” for the Sender and rx for Receiver sides of the channel. These will send and receive stats objects so we’ll name them as such.

Next, we start building up the thread that will house our stats collection. We make sure to give it a name so stack traces, profilers, and other development tools will be able to help us identify what we are seeing. In this case, Stats:Collector. We spawn the thread and hand it a special type of function called a closure, specifying that values it uses from the function creating the closure, should become owned by the closure via the move flag.

We’re going to skip the implementation of stats_socket_server() for now, except to note that it returns a Receiver<Sender<Stats>> which the receiving side of a channel that will contain the sending side of a channel containing stats objects. Oooph a mouthful! Remember the “interesting” design, this is the heart of it. Because, I could have any number of clients connect to the socket over the life of the app, I needed to be able to receive from a single channel on multiple threads. But if you recall above, channels are single consumer. This means I have to spread the messages across multiple channels myself. Part of that design means anytime a new connection comes in, the stats collection service gets another channel to send to.

We make some storage for the channels we’ll be getting back from the socket server, then launch into our loop. A reader may notice that the pattern while let Ok(value) = chan_rx.recv() {} is littered all over my code. I just learned of this and it is terribly useful for working with channels. You see, that stats_rx.recv() call in the code above? That blocks the thread until something is written to stats_tx. When it does return a value, that value is a result that could be Ok<T> where T is the type of the channel, or Err<E> where E is some error type.

Channels will return an Err when you try to read or write to them and the other side of the channel has been closed. Generally when this channel fails it is because I’ve started shutting down the main thread and the Stats:Collector thread hasn’t shut down yet. So as long as the channel is still open, the server will keep running.

Once we get past this while let we have a new Stats object to work with. We check to see if any new connections have come in and add them to the outputs vector. We do it in this order because new connections only matter if there is new data to send to them. We aren’t sending any history. Notice how this loop uses try_recv() instead of recv()to get messages from the channel. This is because we don’t want to wait for a message if there isn’t any, we just want to check and keep going instead. The try version of the function will immediately return an Err if there are no messages ready.

We make a vector to hold onto the indices of the dead channels as we try to send the stats payload to each of them. Since channels return errors when the other side has closed, we close the socket’s side of the channel when the socket closes, letting it cascade the error to here. We then collect the index so we can remove it later. We can’t remove it now since we’re accessing the vector, and rust ensures that while something is reading the data, nothing can write to it. Also, a note, when you use a channel’s send function it takes ownership of the object you are sending. Since my stats objects are pretty small and simple I made them copiable and rust is automatically creating a copy for each outgoing channel.

In the last part of the loop, we do a quick pass to clean up any dead channels. The only other things of note in this function are that the thread creation uses .unwrap() as a deliberate choice because thread creation should never fail, if it does, the application is in some state we didn’t account for and should crash, probably low memory or too many threads. Then finally it returns the stats_tx we made at the top.

Now we get to the other function that makes up this stats collector and server. The goal of this function is to listen for new socket connections and return channels to send to them. Without further adieu here it is:

fn stats_socket_server() -> Receiver<Sender<Stats>> {
    let (new_socket_tx, new_socket_rx) = channel();
    thread::Builder::new()
        .name("Stats:SocketServer".into())
        .spawn(move || {
            let server = TcpListener::bind("127.0.0.1:6327").unwrap();
            let mut connection_id = 0;
            for stream in server.incoming() {
                if let Ok(mut stream) = stream {
                    let (tx, rx): (_, Receiver<Stats>) = channel();
                    new_socket_tx.send(tx).unwrap();
                    thread::Builder::new()
                        .name(format!("Stats:SocketServer:Socket:{}",
                                      connection_id))
                        .spawn(move || {
                            while let Ok(stats) = rx.recv() {
                                let message = format!("[{},{}]\n",
                                                       stats.when,
                                                       stats.duration)
                                                  .into_bytes();
                                if let Err(_) = stream.write(&message) {
                                    // Connection died;
                                    break;
                                }
                            }
                        })
                        .unwrap();
                    connection_id += 1;
                }
            }
        })
        .unwrap();
    new_socket_rx
}

We’ve already discussed the function signature above, but now we’ll get to see the usage of the Sender side of at channel sending channel. Like our first function, we immediately create a channel, one side of which new_socket_rx is returned at the bottom of the function. The other we’ll use soon.

Also familiar is the thread building. This time we name it Stats:SocketServer as that is what will be running in this thread. Moving on, we see TcpListener show up. We create a new TcpListener bound to localhost on port 6327 and unwrap the value. We create a counter we’ll use to uniquely track the socket threads.

We use the .incoming() function much the same way as we use the .recv() function on channels. It will return an Ok<TcpStream> on successful connect or Err<E> when an error happens. We ignore the errors for now and grab the stream in the success case. Each stream will get its own channel so we create channels, simply named tx and rx. We send tx to over new_socket_tx which is connected to the channel sending channel we return.

We build yet another thread, 1 thread per connection would be wasteful if I planned on having a lot of connections, but since I’ll typically only have 0-1 connection, I feel like using a thread for each isn’t too expensive. This is where we used that connection_id counter to uniquely name the thread. Because we may have multiple of these at the same time, we make sure they are named so we can tell them apart.

Inside the thread, we use the now familiar pattern of using .recv() to block and wait for messages. Once we get one, we format it as a 2 element JSON array with a newline on the end. I didn’t want to worry about escaping or using a full JSON serialization library, so I just wrote the values to a string and sent that. The reason for the newline is so the receiving side of the socket can treat it as a “newline delimited JSON stream” which is a convenient way to speak across languages. We note if there is an error trying to write to the socket, and if so, break out of our loop.

The rest is just a little bookkeeping for tracking the connection_id and returning the channel sending channel. While this description has gotten pretty long, the implementation is relatively simple. Speaking of things to build out with time, the last bit of code we’ve not discussed for there rust side of this. The Stats struct.

#[derive(Clone, Copy, Debug)]
pub struct Stats {
    pub when: u64,
    pub duration: u64
}

The reason I didn’t mention it sooner, is it is pretty boring. It holds onto two u64 which are unsigned 64bit integers, or whole positive numbers, that I send over the wire. With time this will certainly grow larger, not sure in what ways though. I could have used a 2-tuple to hold my stats like (u64, u64) instead of a struct. As far as I know they are just as memory efficient. The reason I went with a struct though was for two attributes. First it is a name that I can change the contents of without having to change code everywhere it passes through, just where the struct is created or accessed. If I add another u64 to the tuple above, the function signatures and the points where the data is created and accessed need to change.

The other reason is proper use of the type system. There are many reasons to create a (u64, u64) that have nothing to do with stats, by creating a type we force the API user to be specific about what their data is. Both that the positions of the data are correct by referencing them by name, and because they are in a container with a very specific name. Granted, I’m the API user as well as implementer, but in 6 months, it may as well been implemented by you, for how familiar it’ll be to me.

The electron side of this is actually pretty boring. Because JS is built to work well with events, and this data comes in as a series of events, I basically just propagate them from the socket connection to electron’s IPC, or Inter Process Communication, layer which is one of the first things folks learn when making electron apps. For the graph I used Smoothie and basically just copied their example code and replaced their call to Math.random() with my data.

This project was meant to be the start of development tools for my game engine. A proof of concept for having those tools be external but hooked up via a socket. Next steps will be making the data presentation nicer, possibly making it two way so I can see what debugging tools are enabled and change those settings from this tool, and many other things.

I really hope that this explanation of some rust code was fun and helpful. If you have questions, feel free to ask. Keep in mind this tool and code are not meant to be a bullet proof production used by many people thing, but more just an exploration of a brain worm I had.  While I’m keeping most of my source private, all the source shown here should be considered under the ISC license which basically says do whatever with it and don’t blame me if it turns out to be terrible.

i-can-manage-it Weekly Update 2

A little over a week ago, I started this series about the game I’m writing. Welcome to the second installment. It took a little longer than a week to get around to writing. I wanted to complete the task, determining what tile the user clicked on, I set out for myself at the end of my last post before coming back and writing up my progress. But while we’re on the topic, the “weekly” will likely be a loose amount of time. I’ll aim for each weekend but I don’t want guilt from not posting getting in the way of building the game.

Also, you may notice the name changed just a little bit. I decided to go with the self motivating and cuter name of i-can-manage-it. The name better captures my state of mind when I’m building this. I just assume I can solve a problem and keep working on it until I understand how to solve it or why that approach is not as good as some other approach. I can manage building this game, you’ll be able to manage stuff in the game, we’ll all have a grand time.

So with the intro out of the way, lets talk progress. I’m going to bullet point the things I’ve done and then discuss them in further detail below.

  • Learned more math!
  • Built a bunch of debugging tools into my rendering engine!
  • Can determine what tile the mouse is over!
  • Wrote my first special effect shader!

Learned more math!

If you are still near enough to high school to remember a good amount of the math from it and want to play with computer graphics, keep practicing it! So far I haven’t needed anything terribly advanced to do the graphics I’m currently rendering. In my high school Algebra 2 covered matrix math to a minor degree. Now back then I didn’t realize that this was a start into linear algebra. Similarly, I didn’t consider all the angle and area calculations in geometry to be an important life lesson, just neat attributes of the world expressed in math.

In my last post I mentioned this blog post on 3d transformations which talks about several but not necessarily all coordinate systems a game would have. So, I organized my world coordinate system, the coordinates that my map outputs and game rules use, so that it matched how the X and Y change in OpenGL coordinates. X, as you’d expect gets larger going toward the right of the screen. And if you’ve done much math or looked at graphs, you’ve seen demonstrations of the Y getting larger going toward the top. OpenGL works this way and so I made my map render this way.

You then apply a series of 4×4 matrices that correspond to things like moving the object to where it should be in world coordinates from it’s local coordinates which are the coordinates that might be exported from 3d modelling or generated by the game engine. You also apply a 4×4 matrix for the window’s aspect ratio, zoom, pan and probably other stuff too.

That whole transform process I described above results in a bunch of points that aren’t even on the screen. OpenGL determines that by looking at points between -1 and 1 on each axis and anything outside of that range is culled, which means that the graphics card wont put it on the screen.

I learned that a neat property of these matrices is that many of them are invertable. Which means you can invert the matrix then apply it to a point on the screen and get back where that point is in your world coordinates. If we wanted to know what object was at the center of the screen, we’d take that inverted matrix and multiply it by {x: 0, y: 0, z: 0, w: 1} (as far as I can tell the w servers to make this math magic all work) and get back what world coordinates were at the center of the view. In my case because my world is 2d, that means I can just calculate what tile is at that x and y coordinate and what is the top most thing on that tile. If you had a 3d world, you’d then need to something like ray casting, which sends a ray out from the specified point at the camera’s z axis and moves across the z axis until it encounters something (or hits the back edge).

I spent an afternoon at the library and wrote a few example programs to test this inversion stuff to check my pen and paper math using the cgmath crate. That way I could make sure I understood the math, as well as how to make cgmath do the same thing. I definitely ran into a few snags where I multiplied or added the wrong numbers when working on paper due to taking short cuts. Taking the time to also write the math using code meant I’d catch these errors quickly and then correct how I thought about things. It was so productive and felt great. Also, being surrounded by knowledge in the library is one of my favorite things.

Built a bunch of debugging tools into my rendering engine!

Through my career, I’ve found that the longer you expect the project to last, the more time you should spend on making sure it is debuggable. Since I expect this project to take up the majority of my spare time hacking for at least a few years, maybe even becoming the project I work on longer than any other project before it I know that each debugging tool is probably a sound investment.

Every time I add in a 1 off debugging tool, I work on it for a while getting it to a point to solve my problem at hand. Then, once I’m ready to clean up my code, I think about how many other types or problems that debugging tool might solve and how hard it would be to make easy to access in the future. Luckily, most debugging tools are more awesome when you can toggle them on the fly. If the tool is easy to toggle, I definitely leave it in until it causes trouble adding a new feature.

An example of adapting tools to keep them, my FPS (frames per second) counter I built was logging the FPS to the console every second and had become a hassle. When working on other problems because other log lines would scroll by due to the FPS chatter. So I added a key to toggle the FPS printing, but keep calculating it every frame. I’d thought about removing the calculation too, but decided I’ll probably want to track that metric for a long time so it should probably be a permanent fixture and cost.

A tool I’m pretty proud of had to do with my tile map rendering. My tiles are rendered as a series of triangles, 2 per tile, that are stitched in a triangle strip, which is a series of points where each 3 points is a triangle. I also used degenerate triangles which are triangles that have no area so OpenGL doesn’t render them. I generate this triangle strip once then save it and reuse it with some updated meta data on each frame.

I had some of the points mixed up causing the triangles to cross the whole map that rendered over the tiles. I added the ability to switch to line drawing instead of filled triangles, which helped some of the debugging because I could see more of the triangles. I realized I could take a slice of the triangle strip and only render the first couple points. Then by adding a couple key bindings I could make that dynamic, so I could step through the vertices and verify the order they were drawn in. I immediately found the issue and felt how powerful this debug tool could be.

Debugging takes up an incredible amount of time, I’m hoping by making sure I’ve got a large toolkit I’ll be able to overcome any bug that comes up quickly.

Can determine what tile the mouse is over!

I spent time learning and relearning the math mentioned in the first bullet point to solve this problem. But, I found another bit of math I needed to do for this. Because of how older technology worked, mouse pointers coordinates start in the upper left of the screen and grow bigger going toward the right (like OpenGL) and going toward the bottom (the opposite of OpenGL). Also, because OpenGL coordinates are a -1 to 1 range for the window, I needed to turn the mouse pointer coordinates into that as well.

This inversion of the Y coordinate were a huge source of my problems for a couple days. To make a long story short, I inverted the Y coordinate when I first got it, then I was inverting it again when I was trying to work out what tile the mouse was over. This was coupled with me inverting the Y coordinate in the triangle strip from my map instead of using a matrix transform to account for how I was drawing the map to the console. This combination of bugs meant that if I didn’t pan the camera at all I could get the tile the mouse was over correctly. But, as soon as I panned it up or down, the Y coordinate would be off, moving in the opposite direction of the panning. Took me a long time to hunt this combination of bugs down.

But, the days of debugging made me take a lot of critical looks at my code, taking the time to cleaned up my code and math. Not abstracting it really, just organizing it into more logical blocks and moving some things out of the rendering loop, only recalculating them as needed. This may sound like optimization, but the goal wasn’t to make the code faster, just more logically organized. Also I got a bunch of neat debugging tools in addition to the couple I mentioned above.

So while this project took me a bit longer than expected, I made my code better and am better prepared for my next project.

Wrote my first special effect shader!

I was attempting to rest my brain from the mouse pointer problem by working on shader effects. It was something I wanted to start learning and I set a goal of having a circle at the mouse point that moves outwards. I spent most of my hacking on Sunday on this problem and here are the results. In the upper left click the 2 and change it to 0.5 to make it nice and smooth. Hide the code up in the upper left if that isn’t interesting to you.

First off, glslsandbox is pretty neat. I was able to immediately start experimenting with a shader that had mouse interaction. I started by trying to draw a box around the mouse pointer. I did this because it was simple and I figured calculating the circle would be more expensive than checking the bounding box. I was quickly able to get there. Then a bit of Pythagorean theorem, thanks high school geometry, and I was able to calculate a circle.

The only trouble was that it wasn’t actually a circle. It was an elliptical disc instead, matching the aspect ratio of the window. Meaning that because my window was a rectangle instead of a square, my circle reflected that the window was shorter than it was wide. In the interest of just getting things working, I pulled the orthographic projection I was using in my rendering engine and translated it to glsl and it worked!

Next was to add another circle on the inside, which was pretty simple because I’d already done it once, and scaling the circle’s size with time. Honestly, despite all the maybe scary looking math on that page, it was relatively simple to toss together. I know there are whole research papers on just parts of graphical effects, but it is good to know that some of the more simple ones are able to be tossed together in a few hours. Then later, if I decide I want to really use the effect, I can take the time to deeply understand the problem and write a version using less operations to be more efficient.

On that note, I’m not looking for feedback on that shader I wrote. I know the math is inefficient and the code is pretty messy. I want to use this shader as a practice for taking and effect shader and making it faster. Once I’ve exhausted my knowledge and research I’ll start soliciting friends for feedback, thanks for respecting that!

Wrapping up this incredibly long blog post I want to say everyone in my life has been so incredibly supportive of me building my own game. Co-workers have given me tips on tools to use and books to read, friends have given input on the ideas for my game engine helping guide me in an area I don’t know well. Last and most amazing is my wife, who listens to me prattle away about my problems in my game engine or how some neat math thing I learned works, and then encourages me with her smile.

Catch you in the next update!

i-can-management Weekly Update 1

A couple weeks ago I started writing a game and i-can-management is the directory I made for the project so that’ll be the codename for now. I’m going to write these updates to journal the process of making this game. As I’m going through this process alone, you’ll see all aspects of the game development process as I go through them. That means some weeks may be art heavy, while others game rules, or maybe engine refactoring. I also want to give a glance how I’m feeling about the project and rules I make for myself.

Speaking of rules, those are going to be a central theme on how I actually keep this project moving forward.

  • Optimize only when necessary. This seems obvious, but folks define necessary differently. 60 frames per second with 750×750 tiles on the screen is my current benchmark for whether I need to optimize. I’ll be adding numbers for load times and other aspects once they grow beyond a size that feels comfortable.
  • Abstractions are expensive, use them sparingly.This is something I learned from a Jonathan Blow talk I mention in my previous post. Abstractions can increase or remove flexibility. On one hand reusing components may allow more rapid iteration. On the other hand it may take considerable effort to make systems communicate that weren’t designed to pass messages.I’m making it clear in each effort whether I’m in exploration mode so I work mostly with just 1 function, or if I’m in architect mode where I’m trying to make the next feature a little easier to implement. This may mean 1000 line functions and lots of global like use for a while until I understand how the data will be used. Or it may mean abstracting a concept like the camera to a struct because the data is always used together.
  • Try the easier to implement answer before trying the better answer.I have two goals with this. First, it means I get to start trying stuff faster so I know if I want to pursue it or if I’m kinda off on the idea. Maybe this first implementation will show some other subsystem needs features first so I decide to delay the more correct answer. So in short quicker to test and expose unexpected requirements.The other goal is to explore building games in a more holistic way. Knowing a quick and dirty way to implement something may help when trying to get an idea thrown together really quick. Then knowing how to evolve that code into a better long term solution means next games or ideas that cross pollinate are faster to compose because the underlying concepts are better known.

The last couple weeks have been an exploration of OpenGL via glium the library I’m using to access OpenGL from Rust as well as abstract away the window creation. I’d only ever ran the example before this dive into building a game. From what I remember of doing this in C++ the abstraction it provides for the window creation and interaction, using the glutin library is pretty great. I was able to create a window of whatever size, hook up keyboard and mouse events, and render to the screen pretty fast after going through the tutorial in the glium book.

This brings me to one of the first frustrating points in this project. So many things are focused on 3d these days that finding resources for 2d rendering is harder. If you find them, they are for old versions of OpenGL or use libraries to handle much of the tile rendering. I was hoping to find an article like “I built a 2d tile engine that is pretty fast and these are the techniques I used!” but no such luck. OpenGL guides go immediately into 3d space after getting past basic polygons. But it just means I get to explore more which is probably a good thing.

I already had a deterministic map generator built to use as the source of the tiles on the screen. So, I copy and pasted some of the matrices from the glium book and then tweak the numbers I was using for my tiles until they show up on the screen and looked ok. From here I was pretty stoked. I mean if I have 25×40 tiles on the screen what more could someone ask for. I didn’t know how to make the triangle strips work well for the tiles to be drawn all at once, so I drew each tile to the screen separately, calculating everything on every frame.

I started to add numbers here and there to see how to adjust the camera in different directions. I didn’t understand the math I was working with yet so I was mostly treating it like a black box and I would add or multiply numbers and recompile to see if it did anything. I quickly realized I needed it to be more dynamic so I added detection for the mouse scrolling. Since I’m on my macbook most of the time I’m doing development I can scroll vertically as well as horizontally, making a natural panning feeling.

I noticed that my rendering had a few quirks, and I didn’t understand any of the math that was being used, so I went seeking more sources of information on how these transforms work. At first I was directed to the OpenGL transformations page which set me on the right path, including a primer on the linear algebra I needed. Unfortunately, it quickly turned toward 3d graphics and I didn’t quite understand how to apply it to my use case. In looking for more resources I found Solarium Programmers’ OpenGL 101 page which took some more time with orthographic projects, what I wanted for my 2d game.

Over a few sessions I rewrote all the math to use a coordinate system I understood. This was greatly satisfying, but if I hadn’t started with ignoring the math, I wouldn’t have had a testbed to see if I actually understood the math. A good lesson to remember, if you can ignore a detail for a bit and keep going, prioritize getting something working, then transforming it into something you understand more thoroughly.

I have more I learned in the last week, but this post is getting quite long. I hope to write a post this week about changing from drawing individual tiles to using a single triangle strip for the whole map.

In the coming week my goal is to have mouse clicks interacting with the map working. This involves figuring out what tile the mouse has clicked which I’ve learned isn’t trivial. In parallel I’ll be developing the first set of tiles using Pyxel Edit and hopefully integrating them into the game. Then my map will become richer than just some flat colored tiles.

Here is a screenshot of the game so far for posterity’s sake. It is showing 750×750 tiles with deterministic weighted distribution between grass, water, and dirt:Screen Shot 2016-09-18 at 8.38.15 PM.png:

Changing Optimization Targets

Alternate Title: How I changed my mental model to be a more effective game developer and human.

Back in February 2016, I started my journey as a professional game developer. I joined Sparkypants to work on the backend for Dropzone. This was about 7 months ago at time of writing. I didn’t enter the game development world in the standard ways. I wasn’t at one of the various schools with game dev programs, I didn’t intern at a studio, I haven’t spent much of my personal development time building my own indie games. I had on the other hand, spent years building backend services, writing dev tools, competing in AI competitions, and building a slew of half finished open source projects. In short, I was not a game developer when I started.

My stark contrast in background works to my advantage in many parts of my job. Most of our engineers haven’t worked on backend services and haven’t needed to scale that sort of infrastructure. My lead and friend Johannes has been instrumental in many of my successes so far in the company. He has background in backend development as well as game development and has often been a translator and guide to me as I learn what being a game developer means.

At first, I assumed my contrast would work itself out naturally and I’d just become a game developer by osmosis. If I am surrounded by folks doing this and I’m actively developing a game, I will become a game developer. But that presupposes success, which was only coming to me in limited amounts. The other conclusion would be leaving game development because I wasn’t compatible with it, something I’m unwilling to accept at this time.

I shared my concerns around not fitting the culture at Sparkypants with Johannes, as well as some productivity worries. I’ve learned over the years that if I’m feeling problems like this, my boss may be as well. Johannes with his typical wonderful encouraging personality reminded me that there are large aspects of my personality that fit in with the culture, just maybe my development style and conflict resolution needed work and recommended this talk by Jonathan Blow to show me the mental model that is closer to how many of the other developers operate, among some other advice.

That talk by Jonathan Blow spends a fair amount of its time on the topic of optimization. Whether it is using data oriented techniques to make data series processing faster or drawing in a specific way to make the graphics card use less memory or any number of topics, optimization comes up in nearly every game development talk or article at some point. His point though was that we often spend too much time optimizing the wrong things. If you’ve been in computer science for a bit you’ve inevitably heard at least a fragment of the following quote from Donald Knuth, if not you’re in for a treat, this is a good one:

Programmers waste enormous amounts of time thinking about, or worrying about, the speed of noncritical parts of their programs, and these attempts at efficiency actually have a strong negative impact when debugging and maintenance are considered. We should forget about small efficiencies, say about 97% of the time: premature optimization is the root of all evil. Yet we should not pass up our opportunities in that critical 3%.

The bolded text is the part most folks quote, implying the rest. I had heard this, quoted it, and used it as justification for doing or not doing things many times in the past. But, I’d also forgotten it, I’d apply it when it was convenient for me, but not generally to my software development. Blow starts with the more traditional overthinking algorithms and code in general that most bring up when they speak on premature optimization. Then he followed on with the idea that selecting data structures is a form of optimization. That follow on was a segue to point out that any time you are thinking about a problem, you should keep in mind if it is the most important or urgent problems for you to think about.

The end of the day, your job as a game developer is not to optimize for speed or correctness, but to optimize for fun. This means trying a lot of ideas and throwing many of them out. If you spent a lot of time optimizing for a million users of a feature and only some folks in the company use it before you decide to remove it, you’ve wasted a lot of effort. Maybe not completely, since you’ve probably learned during the process, but that effort could have been put into other features or parts of the system that may actually need attention. This shift in thinking has me letting go of details in more cases, spend less time on projects and focusing on “functional” over “correct and scalable.”

The next day after watching that talk and discussing with Johannes, I attended RustConf and saw a series of amazing talks on Rust and programming in general. Of particular note for changing my mental model was Julia Evan’s closing keynote about learning systems programming with Rust. There were so many things that struck me during that talk, but I’ll just focus on the couple that were most relevant.

First and foremost was the humility in the talk. Julia’s self described experience level was “intermediate developer” while having about as many years of experience as I have and I considered myself a more “senior developer.” At many points over the last couple years I’ve wrestled with this, considering myself senior then seeing evidence that I’m not. As more confident person, it is an easy trap for me to fall into. I’m in my first year as a game developer, regardless of other experience I’m a junior game developer at best.

Starting to internalize this humility has resulted in fighting my coworkers less when they bring up topics that I think I have enough knowledge to weigh in on. The more experienced folks at work have decades of building games behind them. I’m not saying my input to these discussions is worthless, I still have a lot to contribute, but I’ve been able to check my ego at the door more easily and collaborate through topics instead of being contrary.

The humility in the talk makes another major concept from it, life long learning, take on a new light. I’ve always been striving for more knowledge in the computer science space, so life long learning isn’t new to me, but like the optimization discussion above there is more nuance to be discovered. Having humility when trying to learn makes the experience so much richer for all parties. Teachers being humble will not over explain a topic and recognize that their way is not the only way. Learners being humble will be more receptive to ideas that don’t fit their current mental model and seek more information about them.

This post has become quite long, so I’ll try to wrap things up and use further blog posts to explore these ideas with more concrete examples. Writing this has been a mechanism for me to understand some of this change in myself as well as help others who may end up in similar shoes.

If this blog post were a tweet, I think it’d be summarized into “Pay attention to the important things, check your ego at the door, and keep learning.” which I’m sure would get me some retweets and stars or hearts or whatever. And if someone else said it, I’d go “of course, yeah folks mess this up all the time!” But, there is so much more nuance in those ideas. I now realize I’m just a very junior game developer with some other sometimes relevant experience, I’ve so much to learn from my peers and am extremely excited to do so.

If you have additional resources that you’d think I or others who read this would find valuable, please comment below or send me at tweet.

Started Writing a Game

I started writing a game! Here’s the origin:

commit 54dbc81f294b612f7133c8a3a0b68d164fd0322c
Author: Wraithan (Chris McDonald) <xwraithanx@gmail.com>
Date: Mon Sep 5 17:11:14 2016

 initial commit

Ok, now that we’re past that, lets talk about how I got there. I’ve been a gamer all my life, a big portion of the reason I went into software development was to work on video games. I’ve started my own games a couple times around when I as 18. Then every couple years I dabble in rendering Final Fantasy Tactics style battle map.

I’ve also played in a bunch of AI competitions over the years. I love writing programs to play games. Also, I recently started working at Sparkypants, a game studio, on Dropzone a modern take on RTS. I develop a bunch of the supporting services in the game our matchmaking and such.

Another desire that has lead me here is the desire to complete something. I have many started projects but rarely get them to a release quality. I think it is time I make my own game, and the games I’ve enjoyed the most have been management and simulation games. I’ll be drawing from a lot of games in that genre. Prison Architect, Rimworld, FortressCraft Evolved, Factorio, and many more. I want to try implementing lots of the features as experiments to decide what I want to dig further into.

The game isn’t open source currently, maybe eventually. I’m building the game mostly from scratch using rust and the glium abstraction over OpenGl/glutin. I’m going to try to talk about portions of the development on my blog. This may be simple things like new stuff I learn about Rust. Celebrating achievements as I feel proud of myself. And whatever else comes up as I go. If you want to discuss stuff I prefer twitter over comments, but comments are there if you would rather.

So far I’ve built a very simple deterministic map generator. I had to make sure the map got it’s own seed so it could decide when to pull numbers out and ensure consistency. It currently requires the map to be generated in a single pass. I plan to change to more of a procedural generator so I can expand the map as needed during game play.

I started to build a way to visualize the map beyond an ascii representation. I knew I wanted to be on OpenGL so I support all the operating systems I work/play in. In Rust the best OpenGL abstraction I could find was glium which is pretty awesome. It includes glutin so I get window creation and interaction as part of it, without having to stitch it together myself.

This post is getting a bit long. I think I’ll wrap it up here. In the near future (maybe later tonight?) I’ll have another post with my thoughts on rendering tiles, coordinate systems, panning and zooming, etc. I’m just a beginner at all of this so I’m very open to ideas and criticisms, but please also be respectful.